Category: Desert

Stone Fruit Tart

IMG_9860Welcome to the girliest food I have ever made. The pinks, and reds in this dessert are just so fun that some people might say I cant even  (Note: I am not one of those people).

I know I am a little delayed in posting this summertime recipe up on the blog, but if youre living here in Montreal then you know that these past two weeks has been more of a summer than what we had a month ago! So, I guess this recipe is sort of fitting for the weather we are having, but maybe not the produce. Sorry!

fruit tartBut hey, if you dont have good peaches around, save this recipe and keep it somewhere safe because it is one of the easiest dessert recipes youll make, and its tasty and visually stunning. Looks like youve spent HOURS making this tart, when in reality it took a couple of minutes. WIN.

fruit tart

Stone Fruit Tart

Ingredients:

  • 1 puff pastry sheet
  • 3 cups stone fruit, sliced (peach, nectarine, plum, apricot)
  • 2 tbsp honey
  • 2 tbsp sugar
  • juice of 1 lemon
  • dash of salt
  • 1 egg, lightly beaten
  • sugar for sprinkling

Directions:

  1. Pre- heat oven to 375 degrees F. .
  2. Place puff pastry on parchment paper in an attempt to make a rectangular tart
  3. In a bowl mix together the fruit, honey, sugar, salt and lemon juice.
  4. Place puff pastry and the parchment paper on a baking sheet. Pour fruit mixture on top.
  5. Brush the puff pastry border with lightly beaten egg and sprinkle raw sugar on the edges
  6. Bake for about 20-25 minutes, or until golden brown. Once baked, remove form oven and place on wire rack to cool.

Slightly adapted from Bakers Royale

Trail Mix Cookies

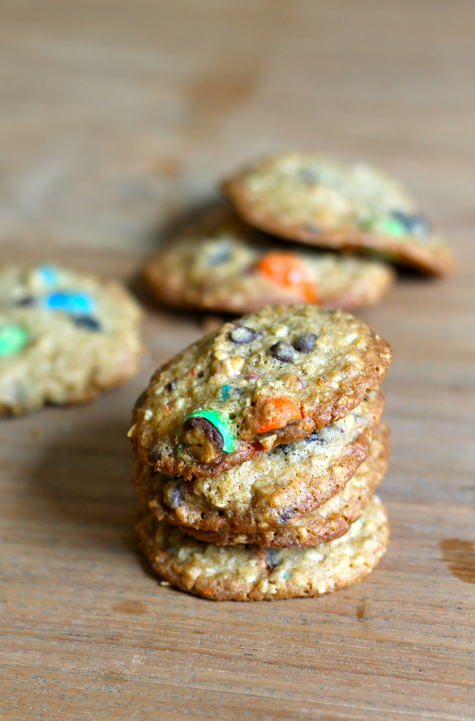
These trail mix cookies have everything in them and are crisp on the outside and chewy on the inside. THE BEST. Heres a little story of how these cookies arrived this fall into my cozy little kitchen, I swear its interesting. Well, maybe notbut like, these cookies are awesome so you should get to the recipe.

When cookies are lying around the house I tend to find crumbs in my hair, sheets and in between couch cushions. I live with someone who inhales cookies the minute he sees them and no, he is not blue and googely eyed (at least not around me!) he is my boyfriend.  And he likes cookies alot!

Since I prefer to not wake up with chocolate chips melted to my cheeks, I dont like to have fresh baked cookies in the house unless I have someone to bring them to.

And thats how these cookies came to be. I need to feed my nephew but he is currently living somewhere warm and toasty and unfortunately unreachable my sisters uterus. Therefore, I made these cookies for her to eat, which is kinda like him eating it too. Im strange, but Ive accepted it.

trail mix cookies - Sundays with Jennie

trail mix cookies - sundays with jennie

trail mix cookies - sundays with jennie

Trail Mix Cookies

Makes 24 large cookies

Ingredients:

  • 2/3 cup butter, softened
  • 1 cup packed brown sugar
  • 1 egg
  • 1 tbsp vanilla
  • 1- 1/2 cups quick cooking oats
  • 1 cup all purpose flour
  • 1/2 tsp baking powder
  • 1/2 tsp baking soda
  • 1/4 tsp salt
  • 1/4 tsp cinnamon
  • 2 TBSP shredded unsweetened coconut flakes
  • 1 cup add ins ex: 1/2 cup raisins, 1/4 cup semisweet chocolate chips, 1/4 cup peanut m+ms

Directions:

  1. Preheat oven to 350 degrees celcius and line 2 large baking sheets with parchment paper.
  2. In a large bowl, beat butter and sugar until fluffy. Then beat in egg and vanilla until incorporated.
  3. In a separate bowl, mix together the dry ingredients; oats, flour, baking powder, baking soda, salt, cinnamon, coconut and add ins.
  4. Stir the dry ingredients into the butter mixture in 4 additions until blended. Cover and regrigerate for 30 minutes.
  5. Then shape dough using a heaping tablespoon into balls (about 24) which place them at least 2 inches apart on the baking sheets. Bake in top and bottom thirds of the oven, switching them halfway through the baking time which is 12-15 minutes total. Cookies should be golden, with crisp edges and soft centres.
  6. Transfer to racks, and let cool.

Peach Ginger Ice Pops

Happy summer everyone! It is officially hot and humid here in Montreal and the festivals are in full swing.and I go back to work. My first day as a doctor was an interesting one. I started off by calling myself a medical student, introducing myself by my first name, and becoming flabbergasted when handed a patients chart to deal with before having orientation to my clinic. The second day was completely different I was officially Dr. Moscovitz with my long white coat and all. WARNING: when urinating, make sure it doesnt fall in the toilet (I was a near miss). The third day I was home sick with fever.

Goshdarnit I ONLY have 6 sick days doesnt my body know to wait till its at least September before I want a day off??? Not day 3!!! Fine Ill admit the Breaking Bad marathon was pretty awesome, but the chills and sore throat was no fun. Its a good thing then that I decided to start making homemade popsicles so that I could use real fruit instead of artificial nonsense. This recipe is super easy it uses peaches, ginger, water and sugar. I cut the sugar down from the original recipe, but they were still super sweet. When I make them again, I may try no added sugar at all (or maybe something like 2 Tbsp).

peach ginger ice popspeach ginger ice popspeach ginger ice pops

Peach and Ginger Ice Pops

Ingredients:

  • 2 oz. fresh ginger root, peeled and sliced into thick coins
  • ½ cup water
  • 1/4 cup sugar
  • 2 ripe peaches, pitted and cut into chunks (skin on)

Directions:

  1. Combine ginger, water, and sugar in small saucepan over medium heat. Bring to a simmer and then reduce heat to low. Allow to simmer for 10 minutes, stirring occasionally. Remove from heat and cool.
  2. Strain mixture through a sieve into a blender and then discard the ginger. Add the peach chunks to the blender and blend until smooth.
  3. Pour mixture into popsicle molds and freeze until solid
 Adapted from Oh My Veggies

Chocolate Chip Scones

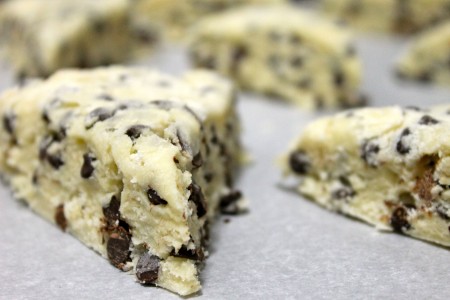
The holiday weekend has come to an end as has the family bonanza. Its a nice time of year where you get to see family and friends from out of town and enjoy good meals and you get time off work. Alas, on my final day off I woke up with a sore throat and fever! Guess that leaves me sitting on the couch and watching Game of Thrones. Tee hee hee.

While this weekend was filled with brisket and matzah ball soup, last week I baked some tasty scones. I ate one and was about to have another when I decided they were safer at my neighbors. Unbeknownst to me, it was the college basketball championshipwhats that called? NCAA or something? I dunno! All I know is, I brought them to my neighbors, there were a bunch of boys there and they all enjoyed these scones. So ladies, these are a winnerbut maybe dont disrupt a beer drinking basketball party with scones it looks weird.

I would suggest serving these for breakfast, or for a brunch. They come together quickly and take no time at all to bake. Best of all, they are moist unlike most other scones Ive tried. They really are a winner, and I plan on making them again this time with different additionsmaybe blueberries?

Oh. And. Winter is coming.

Chocolate Chip Scones

Adapted from: Take a Megabite food blog, originally from Orangette

Ingredients:

  • 1/2 cup milk
  • 1 egg
  • 1/2 tsp vanilla
  • 2 cups all-purpose flour
  • 2 tsp baking powder
  • 1/2 tsp salt
  • 1/2 stick unsalted butter, cubed and chilled
  • 3 Tbsp sugar
  • 1 cup mini chocolate chips
Directions
  1. Preheat oven to 425 degrees.
  2. Beat together the milk and egg and set aside.
  3.  In a large bowl, whisk flour, baking powder, and salt. Rub butter into the flour mixture with your hands. Working until you have no lumps bigger than a pea. Add the sugar and chocolate chips. Stir to mix.
  4. Take a scant 1/4 cup of the milk/egg mixture and set aside to be used for a glaze. Whisk the vanilla into the remaining milk/egg mixture and add to the dry ingredients. Bring dough together gently with a wooden spoon.
  5. Turn dough out onto a lightly floured surface and knead it no more than 12 times.  Pat dough into a round approximately 1/2 inch thick, and cut into 8 (or 12) wedges. Place on an ungreased lined baking sheet. Using a pastry brush, glaze wedges with remaining milk/egg mixture.
  6. Bake for 10-15 minutes, or until golden. Cool on a rack. Can serve with a light dusting of powdered sugar.
Happy holidays! Hope you enjoy the scones!!
– Jennie

Lemon Crinkle Cookies

Yesterday the snow was falling heavily outside, and I watched 90210 (the original) reruns all day in my lounge pants. It was a wonderful day.

Sometimes I just need a day to do absolutely nothing. Catch up on some emails, my fave blogs, and brainless TV while being cozy up on the couch with a hot cup of tea, a fuzzy blanket and some good cookies. Its kind of like hitting pause on the stressors of life, and recuperating the life force thats needed to get through it all.

Yes. It was that kind of week, requiring that kind of day. Requiring a lot of cookies.

These lemon cookies are light, and yummy and go perfectly with a cup of tea. They are also really elegant looking (can you call cookies elegant? Im going with yes), and they are a nice addition to any dessert table or as a gift to a host/hostess.

Lemon Crinkle Cookies

Ingredients:

  • ½ cups butter, softened
  • 1 cup granulated sugar
  • ½ teaspoons vanilla extract
  • 1 whole egg
  • 1 teaspoon lemon zest
  • 1 Tablespoon fresh lemon juice
  • ¼ teaspoons salt
  • ¼ teaspoons baking powder
  • ⅛ teaspoons baking soda
  • 1-½ cup all-purpose flour
  • ½ cups powdered sugar

Directions:

  1. Preheat oven to 350 degrees. Line baking sheets with parchment paper.
  2. In a large bowl, cream butter and sugar together until light and fluffy. Whip in vanilla, egg, lemon zest, and juice.
  3.  Stir in all dry ingredients slowly until just combined, except the powdered sugar. Scrape sides of bowl and mix again briefly.
  4.  Pour powdered sugar onto a large plate. Roll a heaping teaspoon of dough into a ball and roll in powdered sugar. Place on baking sheet and repeat with remaining dough.
  5. Bake for 9-11 minutes or until bottoms begin to barely brown and cookies look matte.
  6. Remove from oven and cool cookies about 3 minutes before transferring to cooling rack.

Source: Laurens Latest

Hope you enjoy these!

Cookies n Cream Rice Krispie Treats

Its holiday time! That means lots of good family dinners, brunches, lunchesso I get to bake! Or not.

Desserts that require minimal to no baking are ideal when you have no time to make elaborate desserts. Last weekend I was busy studying for my surgery exam, but I also had a holiday brunch. A gal like me doesnt want to go to a party empty handed, but I  couldnt spend my study day in the kitchen. Enter rice krispie treats.

While rice krispie treats sound a bit juvenile, when given a tweak they can be a fantastic addition to a dessert table. Ive made cake batter rice krispie treats  in the past that were a hit, and this time around I made a different style of them gangnam style! woohoooo!

I mean

Gosh darn it I just like to dance.

And these cookies and cream rice krispie treats just make me wanna d-a-n-c-ewhile shoving my mouth with marshmallows.

No one judges in my kitchen. Even if  youre my boyfriend, sitting on the couch in our loft, playing assassins creed and oblivious to anything around him. No one judges.

Cookies and Cream Rice Krispie Treats

Ingredients:

Squares:

  • 1/4 cup salted butter
  • 1 (10.5) oz bag mini marshmallows + an additional cup of marshmallows.
  • 6 cups Rice Krispies cereal
  • 10 oreos, chopped into bits

Topping:

  • 1 1/3 cups white chocolate chips
  • 6 oreos, chopped into bits

Directions:

  1. Butter or spray a 13 x 9 pan, set aside.
  2. Melt butter in a large non-stick saucepan over medium low heat, swirling butter up along edges of the pan (this helps the marshmallows stick much less). Stir in marshmallows and stir constantly until melted.
  3. Remove from heat and gently stir in Rice Krispies cereal until evenly coated. Fold in 10 chopped Oreos.
  4. Pour mixture into buttered dish and gently press mixture evenly into dish, set aside.
  5. In a microwave safe bowl, melt white chocolate chips on in 30-45 second intervals, stirring after each interval until melted and smooth.
  6. Spread melted chocolate evenly over Rice Krispie treats and immediately (before chocolate hardens) sprinkle with the 6 chopped Oreos. Gently press the Oreo pieces down with your hands.
  7. Cover and refrigerate about 10 minutes, or alternately let rest on counter until chocolate hardens.

Source: Stylish Cuisine

Enjoy these no bake desserts!

– Jennie

Funfetti Sprinkle Cookies

The sprinkles are back in full force. You know what that means I feel old again and need to make something silly and fun to feel like my young self again.

funfetti cokies

This time, my aging was felt when I walked across campus with my fresh fruit and veggies, excited to go home for a night of cooking and studying. As I cheerfully walked along doing bicep curls with my groceries (gotta get that workout in!), I group of youngins rolled into my bicep curling space. They were sporting neon color shirts, backwards caps, and a glazed over look.

Welcome to frosh week! Yee-Haw!

This month Im working in the Emergency Room and the froshers are flocking in! As I stitch their wounds and get questions about STIs, should I nonchalantly warn them that soon enough they will feel old and tired in the real world? Or is having me awkwardly stitch/smile/giggle enough?

Obvious choice there medicine now and awkward old lady grumblings later.

Note: recipe calls for almond extract you can find it right next to he vanilla extract in your grocery store, its an easy find.

Funfetti Sprinkle Cookies:

Ingredients:
  • 1 cup Butter, Room Temperature
  • 1-¼ cup Sugar
  • 2 teaspoons Vanilla Extract
  • 1 teaspoon Almond Extract
  • 1 whole Egg
  • 2-½ cups Flour
  • ¼ cups Cornstarch
  • ¾ teaspoons Baking Soda
  • ½ teaspoons Salt
  • ½ cups Rainbow Jimmie Sprinkles
  • 2 Tablespoons Nonpareil Sprinkles

Directions:

  1. Preheat the oven to 375ºF.
  2. Cream the butter and sugar in your stand mixer/hand mixer for about 2 minutes, until fluffy. Add the vanilla, almond, and egg. Beat until well combined.
  3. In a separate bowl, sift in the flour, cornstarch, soda, and salt. Slowly add the flour mixture to the butter mixture, and continue on low speed until it’s all added and combined. Mix in all the sprinkles (don’t overmix or the sprinkles will start to bleed into the dough).
  4. Scoop cookie dough onto cookie sheets, about 1 1/2 inches apart. Bake for about 15 minutes. (Note: Only bake until they very slightly start to turn light golden brown just on the edges and baking time will vary on the size of cookie you make. Check them around 10 minutes, then 12, and so on.)
  5. Cool on a wire rack. Store in an airtight container up to 4 days.

Hope you enjoy these fun cookies and enjoy the start of a new school year! Just know if you hurt yourself you may come face-to-face with meand my new stitching skills. Muahah.

– Jennie